您输入电子表格的任何数据始终存储在单元格中.我们使用行和列的标签来标识单元格.本章介绍如何使用Java编程在电子表格中操作单元格中的数据.
创建单元格
您需要在创建之前创建一行细胞.行只是一组单元格.
以下代码片段用于创建单元格.
//create new workbookXSSFWorkbook workbook = new XSSFWorkbook(); //create spreadsheet with a nameXSSFSheet spreadsheet = workbook.createSheet("new sheet");//create first row on a created spreadsheetXSSFRow row = spreadsheet.createRow(0);//create first cell on created rowXSSFCell cell = row.createCell(0);单元格类型
单元格类型指定单元格是否可以包含字符串,数值或公式.字符串单元格不能保存数值,而数字单元格不能保存字符串.下面给出了单元格的类型,它们的值和类型语法.
| 单元格值的类型 | 类型语法 |
|---|---|
| 空单元格值 | XSSFCell.CELL_TYPE_BLANK |
| 布尔单元格值 | XSSFCell.CELL.TYPE_BOOLEAN |
| 错误单元格值 | XSSFCell.CELL_TYPE_ERROR |
| 数字单元格值 | XSSFCell.CELL_TYPE_NUMERIC |
| 字符串单元格值 | XSSFCell.CELL_TYPE_STRING |
以下代码用于创建不同类型的单元格在电子表格中.
import java.io.File;import java.io.FileOutputStream;import java.util.Date;import org.apache.poi.xssf.usermodel.XSSFCell;import org.apache.poi.xssf.usermodel.XSSFRow;import org.apache.poi.xssf.usermodel.XSSFSheet;import org.apache.poi.xssf.usermodel.XSSFWorkbook;public class TypesofCells { public static void main(String[] args)throws Exception { XSSFWorkbook workbook = new XSSFWorkbook(); XSSFSheet spreadsheet = workbook.createSheet("cell types"); XSSFRow row = spreadsheet.createRow((short) 2); row.createCell(0).setCellValue("Type of Cell"); row.createCell(1).setCellValue("cell value"); row = spreadsheet.createRow((short) 3); row.createCell(0).setCellValue("set cell type BLANK"); row.createCell(1); row = spreadsheet.createRow((short) 4); row.createCell(0).setCellValue("set cell type BOOLEAN"); row.createCell(1).setCellValue(true); row = spreadsheet.createRow((short) 5); row.createCell(0).setCellValue("set cell type ERROR"); row.createCell(1).setCellValue(XSSFCell.CELL_TYPE_ERROR ); row = spreadsheet.createRow((short) 6); row.createCell(0).setCellValue("set cell type date"); row.createCell(1).setCellValue(new Date()); row = spreadsheet.createRow((short) 7); row.createCell(0).setCellValue("set cell type numeric"); row.createCell(1).setCellValue(20 ); row = spreadsheet.createRow((short) 8); row.createCell(0).setCellValue("set cell type string"); row.createCell(1).setCellValue("A String"); FileOutputStream out = new FileOutputStream(new File("typesofcells.xlsx")); workbook.write(out); out.close(); System.out.println("typesofcells.xlsx written successfully"); } }将上述代码保存在名为 TypesofCells.java 的文件中,编译并执行它来自命令提示符,如下所示.
$javac TypesofCells.java$java TypesofCells
如果您的系统配置了POI库,那么它将编译并执行以在当前目录中生成名为 typesofcells.xlsx 的Excel文件并显示以下输出.
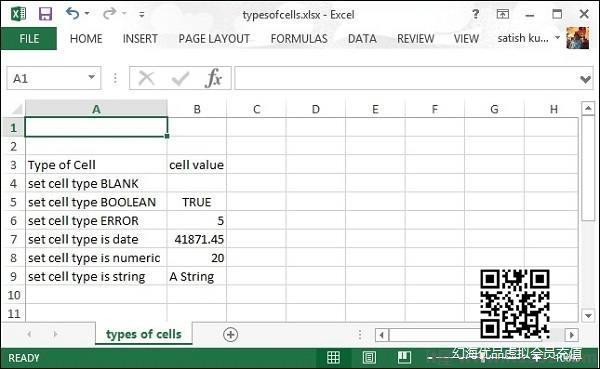
typesofcells.xlsx写成功
typesofcells .xlsx 文件如下所示.
单元格样式
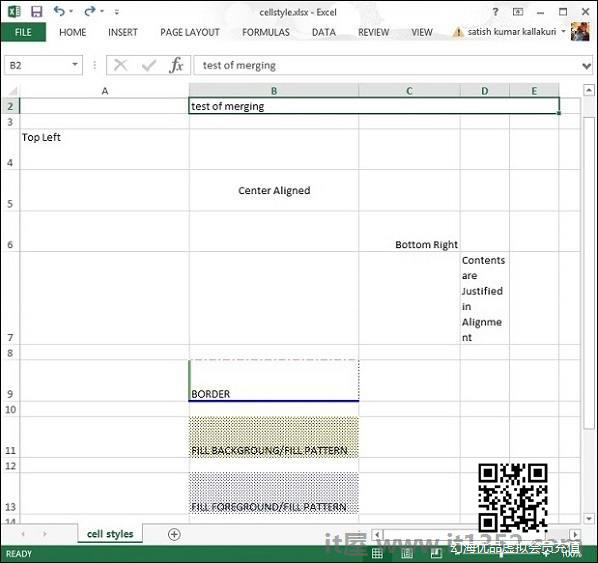
在这里,您可以学习如何进行单元格格式化并应用不同的样式,例如合并相邻单元格,添加边框,设置单元格对齐以及填充颜色.
以下代码用于应用不同的样式使用Java编程的单元格.
import java.io.File;import java.io.FileOutputStream;import org.apache.poi.hssf.util.HSSFColor;import org.apache.poi.ss.usermodel.IndexedColors;import org.apache.poi.ss.util.CellRangeAddress;import org.apache.poi.xssf.usermodel.XSSFCell;import org.apache.poi.xssf.usermodel.XSSFCellStyle;import org.apache.poi.xssf.usermodel.XSSFRow;import org.apache.poi.xssf.usermodel.XSSFSheet;import org.apache.poi.xssf.usermodel.XSSFWorkbook;public class CellStyle { public static void main(String[] args)throws Exception { XSSFWorkbook workbook = new XSSFWorkbook(); XSSFSheet spreadsheet = workbook.createSheet("cellstyle"); XSSFRow row = spreadsheet.createRow((short) 1); row.setHeight((short) 800); XSSFCell cell = (XSSFCell) row.createCell((short) 1); cell.setCellValue("test of merging"); //MEARGING CELLS //this statement for merging cells spreadsheet.addMergedRegion( new CellRangeAddress( 1, //first row (0-based) 1, //last row (0-based) 1, //first column (0-based) 4 //last column (0-based) ) ); //CELL Alignment row = spreadsheet.createRow(5); cell = (XSSFCell) row.createCell(0); row.setHeight((short) 800); // Top Left alignment XSSFCellStyle style1 = workbook.createCellStyle(); spreadsheet.setColumnWidth(0, 8000); style1.setAlignment(XSSFCellStyle.ALIGN_LEFT); style1.setVerticalAlignment(XSSFCellStyle.VERTICAL_TOP); cell.setCellValue("Top Left"); cell.setCellStyle(style1); row = spreadsheet.createRow(6); cell = (XSSFCell) row.createCell(1); row.setHeight((short) 800); // Center Align Cell Contents XSSFCellStyle style2 = workbook.createCellStyle(); style2.setAlignment(XSSFCellStyle.ALIGN_CENTER); style2.setVerticalAlignment(XSSFCellStyle.VERTICAL_CENTER); cell.setCellValue("Center Aligned"); cell.setCellStyle(style2); row = spreadsheet.createRow(7); cell = (XSSFCell) row.createCell(2); row.setHeight((short) 800); // Bottom Right alignment XSSFCellStyle style3 = workbook.createCellStyle(); style3.setAlignment(XSSFCellStyle.ALIGN_RIGHT); style3.setVerticalAlignment(XSSFCellStyle.VERTICAL_BOTTOM); cell.setCellValue("Bottom Right"); cell.setCellStyle(style3); row = spreadsheet.createRow(8); cell = (XSSFCell) row.createCell(3); // Justified Alignment XSSFCellStyle style4 = workbook.createCellStyle(); style4.setAlignment(XSSFCellStyle.ALIGN_JUSTIFY); style4.setVerticalAlignment(XSSFCellStyle.VERTICAL_JUSTIFY); cell.setCellValue("Contents are Justified in Alignment"); cell.setCellStyle(style4); //CELL BORDER row = spreadsheet.createRow((short) 10); row.setHeight((short) 800); cell = (XSSFCell) row.createCell((short) 1); cell.setCellValue("BORDER"); XSSFCellStyle style5 = workbook.createCellStyle(); style5.setBorderBottom(XSSFCellStyle.BORDER_THICK); style5.setBottomBorderColor(IndexedColors.BLUE.getIndex()); style5.setBorderLeft(XSSFCellStyle.BORDER_DOUBLE); style5.setLeftBorderColor(IndexedColors.GREEN.getIndex()); style5.setBorderRight(XSSFCellStyle.BORDER_HAIR); style5.setRightBorderColor(IndexedColors.RED.getIndex()); style5.setBorderTop(XSSFCellStyle.BIG_SPOTS); style5.setTopBorderColor(IndexedColors.CORAL.getIndex()); cell.setCellStyle(style5); //Fill Colors //background color row = spreadsheet.createRow((short) 10 ); cell = (XSSFCell) row.createCell((short) 1); XSSFCellStyle style6 = workbook.createCellStyle(); style6.setFillBackgroundColor(HSSFColor.LEMON_CHIFFON.index ); style6.setFillPattern(XSSFCellStyle.LESS_DOTS); style6.setAlignment(XSSFCellStyle.ALIGN_FILL); spreadsheet.setColumnWidth(1,8000); cell.setCellValue("FILL BACKGROUNG/FILL PATTERN"); cell.setCellStyle(style6); //Foreground color row = spreadsheet.createRow((short) 12); cell = (XSSFCell) row.createCell((short) 1); XSSFCellStyle style7 = workbook.createCellStyle(); style7.setFillForegroundColor(HSSFColor.BLUE.index); style7.setFillPattern( XSSFCellStyle.LESS_DOTS); style7.setAlignment(XSSFCellStyle.ALIGN_FILL); cell.setCellValue("FILL FOREGROUND/FILL PATTERN"); cell.setCellStyle(style7); FileOutputStream out = new FileOutputStream(new File("cellstyle.xlsx")); workbook.write(out); out.close(); System.out.println("cellstyle.xlsx written successfully"); } }将上述代码保存在名为 CellStyle.java 的文件中,编译并执行它来自命令提示符,如下所示.
$javac CellStyle.java$java CellStyle
它会在当前目录中生成一个名为 cellstyle.xlsx 的Excel文件,并显示以下输出.
cellstyle.xlsx written successfully
cellstyle.xlsx文件如下所示.