要创建一个简单的EJB模块,我们将使用NetBeans"新建项目"向导.在下面给出的示例中,我们将创建一个名为Component的EJB模块项目.
创建项目
在NetBeans IDE中,选择文件>新项目> .您将看到以下屏幕
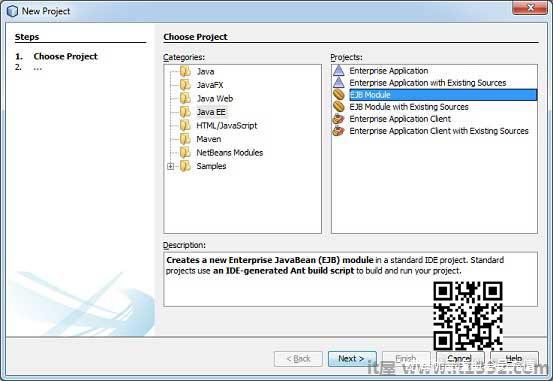
选择类别 Java EE 下的项目类型,项目类型为 EJB模块.点击下一步> 按钮.您将看到以下屏幕.
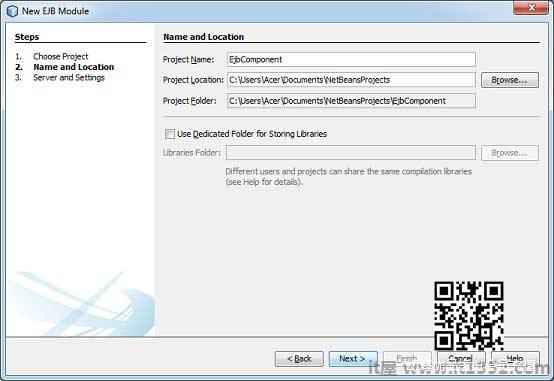
输入项目名称和位置.点击下一步> 按钮.您将看到以下屏幕.
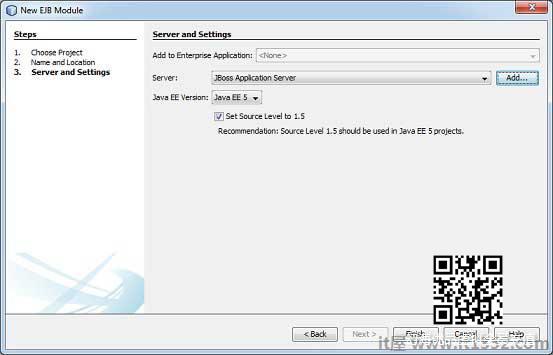
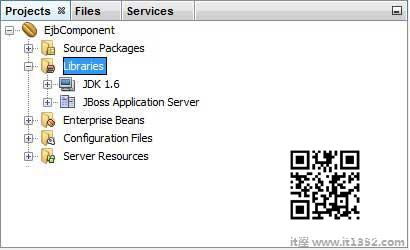
选择Server作为 JBoss Application Server .单击完成按钮.您将看到NetBeans创建的以下项目.
创建示例EJB
要创建简单的EJB,我们将使用NetBeans"新建"向导.在下面给出的示例中,我们将在EjbComponent项目下创建名为librarySessionBean的无状态EJB类.
在项目资源管理器窗口中选择项目EjbComponent并右键单击它.选择,新建>会话Bean .您将看到新会话Bean 向导.
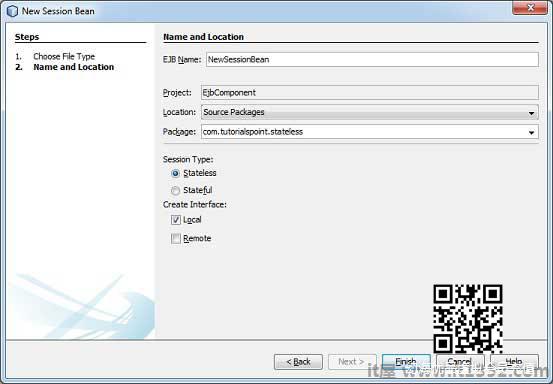
输入会话bean名称和包名称.单击完成按钮.您将看到NetBeans创建的以下EJB类.
LibrarySessionBean : 无状态会话bean
LibrarySessionBeanLocal : 会话bean的本地接口
我正在将本地接口更改为远程接口,因为我们将在基于控制台的应用程序中访问我们的EJB.远程/本地接口用于公开EJB必须实现的业务方法.
LibrarySessionBeanLocal重命名为LibrarySessionBeanRemote,LibrarySessionBean实现LibrarySessionBeanRemote接口.
LibrarySessionBeanRemote
package com.it1352.stateless; import java.util.List;import javax.ejb.Remote; @Remotepublic interface LibrarySessionBeanRemote { void addBook(String bookName); List getBooks(); }LibrarySessionBean
package com.it1352.stateless; import java.util.ArrayList;import java.util.List;import javax.ejb.Stateless; @Statelesspublic class LibrarySessionBean implements LibrarySessionBeanRemote { List bookShelf; public LibrarySessionBean() { bookShelf = new ArrayList(); } public void addBook(String bookName) { bookShelf.add(bookName); } public List getBooks() { return bookShelf; }}} 构建项目
在Project Explorer窗口中选择EjbComponent项目.
右键单击它以打开上下文菜单.
选择清理和构建.
您将在NetBeans控制台输出中看到以下输出.
ant -f C:\\EJB\\EjbComponent clean distinit:undeploy-clean:deps-clean:Deleting directory C:\EJB\EjbComponent\buildDeleting directory C:\EJB\EjbComponent\distclean:init:deps-jar:Created dir: C:\EJB\EjbComponent\build\classesCopying 3 files to C:\EJB\EjbComponent\build\classes\META-INFCreated dir: C:\EJB\EjbComponent\build\emptyCreated dir: C:\EJB\EjbComponent\build\generated-sources\ap-source-outputCompiling 2 source files to C:\EJB\EjbComponent\build\classeswarning: [options] bootstrap class path not set in conjunction with -source 1.6Note: C:\EJB\EjbComponent\src\java\com\IT屋\stateless\LibraryPersistentBean.java uses unchecked or unsafe operations.Note: Recompile with -Xlint:unchecked for details.1 warningcompile:library-inclusion-in-archive:Created dir: C:\EJB\EjbComponent\distBuilding jar: C:\EJB\EjbComponent\dist\EjbComponent.jardist:BUILD SUCCESSFUL (total time: 3 seconds)
启动应用程序服务器
在"服务"窗口中的"服务器"下选择JBoss应用程序服务器.
右键单击它以打开上下文菜单.
选择开始.
您将在NetBeans中看到以下输出,在JBoss Application Server下输出.
Calling C:\jboss-5.1.0.GA\bin\run.conf.bat========================================================================= JBoss Bootstrap Environment JBOSS_HOME: C:\jboss-5.1.0.GA JAVA: C:\Program Files (x86)\Java\jdk1.6.0_21\bin\java JAVA_OPTS: -Dprogram.name=run.bat -Xms128m -Xmx512m -server CLASSPATH: C:\jboss-5.1.0.GA\bin\run.jar ========================================================================= 16:25:50,062 INFO [ServerImpl] Starting JBoss (Microcontainer)...16:25:50,062 INFO [ServerImpl] Release ID: JBoss [The Oracle] 5.1.0.GA (build: SVNTag=JBoss_5_1_0_GA date=200905221634)... 16:26:40,420 INFO [TomcatDeployment] deploy, ctxPath=/admin-console16:26:40,485 INFO [config] Initializing Mojarra (1.2_12-b01-FCS) for context '/admin-console'16:26:42,362 INFO [TomcatDeployment] deploy, ctxPath=/16:26:42,406 INFO [TomcatDeployment] deploy, ctxPath=/jmx-console16:26:42,471 INFO [Http11Protocol] Starting Coyote HTTP/1.1 on http-127.0.0.1-808016:26:42,487 INFO [AjpProtocol] Starting Coyote AJP/1.3 on ajp-127.0.0.1-800916:26:42,493 INFO [ServerImpl] JBoss (Microcontainer) [5.1.0.GA (build: SVNTag=JBoss_5_1_0_GA date=200905221634)] Started in 52s:427ms
部署项目
在Project Explorer窗口中选择EjbComponent项目.
右键单击它以打开上下文菜单.
选择Deploy.
您将在NetBeans控制台输出中看到以下输出.
ant -f C:\\EJB\\EjbComponent -DforceRedeploy=true -Ddirectory.deployment.supported=false -Dnb.wait.for.caches=true runinit:deps-jar:compile:library-inclusion-in-archive:Building jar: C:\EJB\EjbComponent\dist\EjbComponent.jardist-directory-deploy:pre-run-deploy:Checking data source definitions for missing JDBC drivers...Distributing C:\EJB\EjbComponent\dist\EjbComponent.jar to [org.jboss.deployment.spi.LocalhostTarget@1e4f84ee]Deploying C:\EJB\EjbComponent\dist\EjbComponent.jarApplication DeployedOperation start startedOperation start completedpost-run-deploy:run-deploy:run:BUILD SUCCESSFUL (total time: 2 seconds)
JBoss应用服务器日志输出
16:30:00,963 INFO [DeployHandler] Begin start, [EjbComponent.jar]...16:30:01,233 INFO [Ejb3DependenciesDeployer] Encountered deployment AbstractVFSDeploymentContext@12038795{vfszip:/C:/jboss-5.1.0.GA/server/default/deploy/EjbComponent.jar/}...16:30:01,281 INFO [JBossASKernel] jndi:LibrarySessionBean/remote-com.IT屋.stateless.LibrarySessionBeanRemote16:30:01,281 INFO [JBossASKernel] Class:com.IT屋.stateless.LibrarySessionBeanRemote16:30:01,281 INFO [JBossASKernel] jndi:LibrarySessionBean/remote16:30:01,281 INFO [JBossASKernel] Added bean(jboss.j2ee:jar=EjbComponent.jar,name=LibrarySessionBean,service=EJB3) to KernelDeployment of: EjbComponent.jar16:30:01,282 INFO [JBossASKernel] installing bean: jboss.j2ee:jar=EjbComponent.jar,name=BookMessageHandler,service=EJB316:30:01,282 INFO [JBossASKernel] with dependencies:16:30:01,282 INFO [JBossASKernel] and demands:16:30:01,282 INFO [JBossASKernel] jboss.ejb:service=EJBTimerService...16:30:01,283 INFO [EJB3EndpointDeployer] Deploy AbstractBeanMetaData@5497cb{name=jboss.j2ee:jar=EjbComponent.jar, name=LibrarySessionBean, service=EJB3_endpoint bean=org.jboss.ejb3.endpoint.deployers.impl.EndpointImpl properties=[container] constructor=null autowireCandidate=true}...16:30:01,394 INFO [SessionSpecContainer] Starting jboss.j2ee:jar=EjbComponent.jar,name=LibrarySessionBean,service=EJB316:30:01,395 INFO [EJBContainer] STARTED EJB: com.IT屋.stateless.LibrarySessionBean ejbName: LibrarySessionBean16:30:01,401 INFO [JndiSessionRegistrarBase] Binding the following Entries in Global JNDI: LibrarySessionBean/remote - EJB3.x Default Remote Business Interface LibrarySessionBean/remote-com.IT屋.stateless.LibrarySessionBeanRemote - EJB3.x Remote Business Interface16:30:02,723 INFO [SessionSpecContainer] Starting jboss.j2ee:jar=EjbComponent.jar,name=LibrarySessionBean,service=EJB316:30:02,723 INFO [EJBContainer] STARTED EJB: com.IT屋.stateless.LibrarySessionBean ejbName: LibrarySessionBean16:30:02,731 INFO [JndiSessionRegistrarBase] Binding the following Entries in Global JNDI: LibrarySessionBean/remote - EJB3.x Default Remote Business Interface LibrarySessionBean/remote-com.IT屋.stateless.LibrarySessionBeanRemote - EJB3.x Remote Business Interface创建访问EJB的客户端
在NetBeans IDE中,选择文件>新项目> .
在类别 Java 下选择项目类型,项目类型为 Java Application .单击下一步>按钮
输入项目名称和位置.点击完成> 按钮.我们选择了名称为EjbTester.
在Project explorer窗口中右键单击项目名称.选择属性.
使用
编译标签. 使用编译中的添加jar/文件夹按钮添加jboss库>标签. Jboss库可以位于< jboss安装文件夹>>客户端文件夹.
在项目下创建jndi.properties说EjbTester.
jndi.properties
java.naming.factory.initial=org.jnp.interfaces.NamingContextFactoryjava.naming.factory.url.pkgs=org.jboss.naming:org.jnp.interfacesjava.naming.provider.url=localhost
创建包com.it1352.test和它下面的EJBTester.java类.
EJBTester.java
package com.it1352.test; import com.IT屋.stateless.LibrarySessionBeanRemote;import java.io.BufferedReader;import java.io.FileInputStream;import java.io.IOException;import java.io.InputStreamReader;import java.util.List;import java.util.Properties;import javax.naming.InitialContext;import javax.naming.NamingException; public class EJBTester { BufferedReader brConsoleReader = null; Properties props; InitialContext ctx; { props = new Properties(); try { props.load(new FileInputStream("jndi.properties")); } catch (IOException ex) { ex.printStackTrace(); } try { ctx = new InitialContext(props); } catch (NamingException ex) { ex.printStackTrace(); } brConsoleReader = new BufferedReader(new InputStreamReader(System.in)); } public static void main(String[] args) { EJBTester ejbTester = new EJBTester(); ejbTester.testStatelessEjb(); } private void showGUI() { System.out.println("**********************"); System.out.println("Welcome to Book Store"); System.out.println("**********************"); System.out.print("Options \n1. Add Book\n2. Exit \nEnter Choice: "); } private void testStatelessEjb() { try { int choice = 1; LibrarySessionBeanRemote libraryBean = (LibrarySessionBeanRemote)ctx.lookup("LibrarySessionBean/remote"); while (choice != 2) { String bookName; showGUI(); String strChoice = brConsoleReader.readLine(); choice = Integer.parseInt(strChoice); if (choice == 1) { System.out.print("Enter book name: "); bookName = brConsoleReader.readLine(); libraryBean.addBook(bookName); }else if (choice == 2) { break; } } List booksList = libraryBean.getBooks(); System.out.println("Book(s) entered so far: " + booksList.size()); for (int i = 0; i < booksList.size(); ++i) { System.out.println((i+1)+". " + booksList.get(i)); } LibrarySessionBeanRemote libraryBean1 = (LibrarySessionBeanRemote)ctx.lookup("LibrarySessionBean/remote"); List booksList1 = libraryBean1.getBooks(); System.out.println( "***Using second lookup to get library stateless object***"); System.out.println( "Book(s) entered so far: " + booksList1.size()); for (int i = 0; i < booksList1.size(); ++i) { System.out.println((i+1)+". " + booksList1.get(i)); } } catch (Exception e) { System.out.println(e.getMessage()); e.printStackTrace(); } finally { try { if(brConsoleReader !=null) { brConsoleReader.close(); } } catch (IOException ex) { System.out.println(ex.getMessage()); } } } } 运行客户端访问EJB
在项目资源管理器中找到EJBTester.java.右键单击EJBTester类并选择运行文件.
在Netbeans控制台中验证以下输出.
run:**********************Welcome to Book Store**********************Options 1. Add Book2. Exit Enter Choice: 1Enter book name: Learn Java**********************Welcome to Book Store**********************Options 1. Add Book2. Exit Enter Choice: 2Book(s) entered so far: 11. Learn Java***Using second lookup to get library stateless object***Book(s) entered so far: 0BUILD SUCCESSFUL (total time: 13 seconds)
在接下来的章节中,我们将介绍这个完整EJB应用程序的多个方面.